
A little announcement: I added a Related Tech News section to the Carmen’s Graphics Blog home page.

I added this Related Tech News section because it aligns with my goals to grow the blog that I described in the About section. However, I lacked a way to see if these news links would ever get clicked.
This problem prompted me to write this post because I wanted to install something on my website to collect data from events such as clicks…
This problem is certainly solved, and it’s really a matter of choosing the correct software to help us do the job !
Spolier Alert: I use Google Tag Manager and it’s really easy to use.
Over the course of this post, we’ll dive into what exactly Google Tag Manager is and how to install it onto your own website.
Why collect event data
Why should we care? For various reasons, of course:
- To see if it’s worth committing more time to further developing a feature.
- To potentially A/B test new features to see how users react.
Personally, I am very curious to learn more about my readers, and quite frankly I don’t have too much time to waste on a feature that nobody really cares to view!
So to me, it’s worth collecting some data in order to allocate my time wisely when improving the blog!
Google Tag Manager
Fortunately, there is a free application created by Google that can help us collect the data we want.
Google Tag Manager (GTM) is a tool created by Google that allows website owners to manage and deploy “tags” for marketing and advertising analysis (code snippets) on their website without the need to do manual coding.
With GTM, website owners can easily add, edit or remove “tags” from their website by simply adding or removing them from the GTM interface.
Non-developers can also quickly update tags through the GTM UI as needed without relying on developers to make changes to website code.
GTM ultimately saves time and money for all parties involved. as it helps website owners make data-driven decisions to improve their website’s performance, feature-set, and user experience.
Where does the word Tag come from?
In Google vocabulary, a tag is a code snippet that you can add to your website.
Google Tag Manager manages these tags, hence the name of this app.
Tags can be used to track various actions on a website, such as:
- Clicks on buttons and links
- Form submissions
- Page views.
Examples of “tags” would include Google Analytics, Facebook Pixel, AdWords and many others.
How does Google Tag Manager work ?
Here’s how GTM works:
Step 1: Implementation
The website owner installs the GTM code snippet on their website. This code snippet is a JavaScript code that loads the GTM container on the website.
We will see how to install this GTM code snippet in a following section.
Step 2: Setting Up Tags:
The website owner creates tags in GTM for the different tracking and analytics tools they want to use on their website.
For example, they could set up:
- A tag for Google Analytics
- A tag for Facebook Pixel
- A tag for AdWords conversion tracking.
The list here goes on and on!
Step 3: Creating Triggers
The website owner then sets up triggers for each tag.
Triggers are events that activate the tag, such as when a specific page is loaded or when a specific button is clicked.
Step 4: Testing and Publishing
After setting up tags and triggers, the website owner can test the tags to ensure they are working as intended.
Once the tags are tested, they can be published to the website so that they start tracking website data.
How to Install GTM to Track Clicks
Before continuing on, verify that you have already created a GTM account and are connected to the GTM console.
Step 1: Install GTM on your website
The first step is to install the GTM code snippet in order to run GTM on your website and start tracking clicks.
To find this snippet, navigate to the Admin panel:
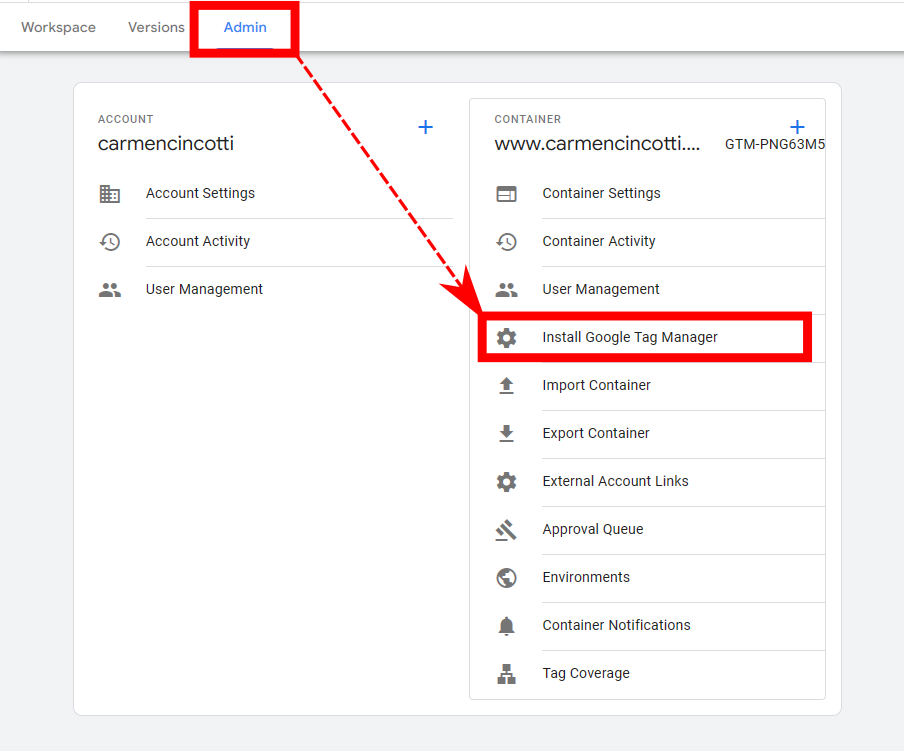
Then navigate to Install Google Tag Manager and copy/paste the code into your website.
Step 1.5: Install GTM on GatsbyJS
If you use GatsbyJS to host a static blog like mine, you can easily install GTM with yarn or npm via gatsby-plugin-google-tagmanager with the following command:
yarn add -D gatsby-plugin-google-tagmanager
Please follow the documentation of gatsby-plugin-google-tagmanager to configure this package.
Step 2: Configure variables
Variables in Google Tag Manager are placeholders for values which are populated when our code runs on our website or app.
We just need to make them available for later use!
To do this, click “Variables” in the menu on the left. Then, navigate to the right at the top and click “Configure”:
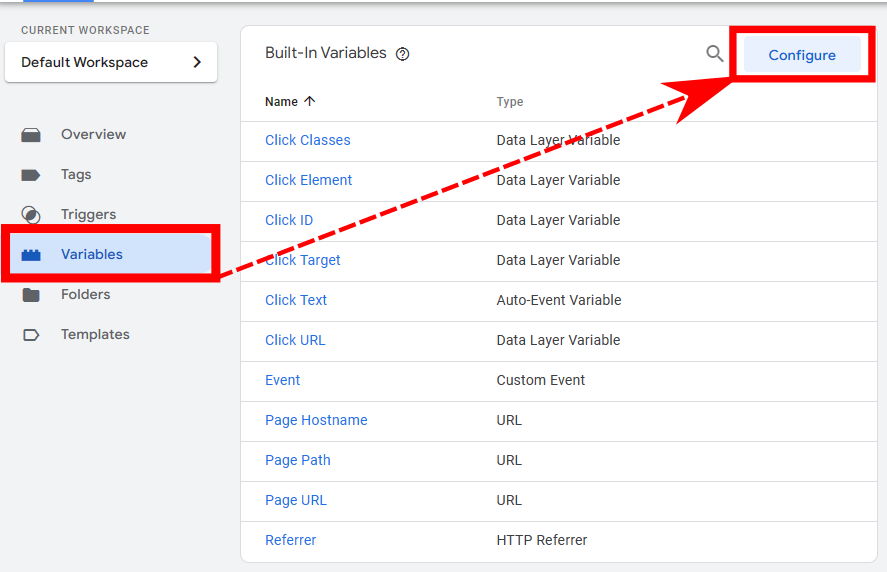
Then, we must check each checkbox for variables that we want to be available to our tags…
In our case, these are the checkboxes that contain Click in their name, under the Clicks section:

Step 3: Configure Triggers
Now let’s navigate to the Triggers section on the menu on the left.
We need to configure triggers which GTM will use in order to trigger GTM tags.
For example, if I click on a link with a class that matches on that is defined in the list of Event Parameters, the tag will fire!
In our case, for the news links on my home page, each link is an HTML anchor tag, <a>, which has a class of news-link.
<a href={URL} class="news-link">{TEXT}</a>
To configure such a behavior, we’ll set our trigger configuration similar to that in the image below:

The tag will fire when a link is clicked with a class of news-link!
Step 4: Configure Tags
Now let’s navigate to the Tags section on the menu on the left.
I’m going to configure a tag to be of a type Google Analytics: GA4 Event since it’s very easy to pipe this data into my existing GA4 account:

With this configuration, if someone clicks a link with a class of news-link, we would see in Google Analytics an event called news_link_click with parameters news_link_url and news_link_text.
Step 5: Deployment
To deploy the changes of the GTM configuration, nothing is simpler!
You have two options. You can preview the triggering of the tags (recommended) by clicking the Preview button in the top right menu of the GTM home page.
The other option is to do the direct deployment by clicking Submit:

Going forward, you should now see these events fire on your website!