- What is Kubernetes?
- What is Minikube?
- How does Minikube work?
- What is WSL?
- Why use WSL?
- How does WSL work?
- How to use minikube on WSL
- Resources
This week, I started taking a course to become certified with the use of Kubernetes using a course provided by [The Linux Foundation](https:/ /www.linuxfoundation.org/).
Having a Certified Kubernetes Administrator (CKA) certification would be good for my career as a DevOps engineer.
However, I’ve been trying to follow the lab exercises without using a cloud provider like Amazon Web Services (AWS) or Google Cloud Platform (GCP).
Why? These platforms are expensive, and they require my credit card. I’m not warm to the idea to pay money to learn how to use a software like Kubernetes.
Fortunately there’s app that we can use in order to run a Kubernetes cluster locally on our computers for free.
This software is called minikube.
During this article, we will see together how to install minikube on WSL to run a Kubernetes environment on your computer.
After reading this article, you’ll be able to develop and test Kubernetes for free using WSL (Ubuntu).
What is Kubernetes?
Kubernetes is an open-source container orchestration system that automates the deployment, scaling, and management of containerized applications. It was originally developed by Google and is now maintained by the Cloud Native Computing Foundation (CNCF).
Kubernetes has become the de facto standard for container orchestration and is widely used by organizations of all sizes to deploy and manage their containerized applications in production environments.
Why use Kubernetes?
With Kubernetes, developers can easily deploy and manage containerized applications across a cluster of servers or virtual machines.
Kubernetes abstracts away the underlying infrastructure and provides a unified API for deploying and managing applications, allowing developers to focus on writing code rather than worrying about infrastructure.
Features of Kubernetes
Kubernetes provides a number of powerful features, including:
- Automatic scaling
- Rolling updates
- Self-healing
- Service discovery
These features help to ensure that applications are always available and running smoothly, even in the face of hardware or software failures.
What is Minikube?
Minikube is a lightweight, open-source tool that enables developers to run and test Kubernetes clusters locally on their own machines.
It provides a simple and easy way to experiment with and test Kubernetes without requiring a full-scale production environment.
How does Minikube work?
Minikube allows developers to create a single-node (…or multiple node if configured correctly) Kubernetes cluster on their local machine using a virtual machine or a container runtime, such as Docker.
Minikube provides an API and command-line interface that allows developers to interact with the Kubernetes cluster running on their local machine, just as they would with a production Kubernetes environment.
This makes it easy to test and debug applications before deploying them to a production environment without the need for expensive infrastructure or cloud services.
Overall, Minikube is a valuable tool for developers who want to:
- Learn Kubernetes
- Experiment with new features
- Test their applications in a local environment
What is WSL?
Windows Subsystem for Linux (WSL) is a feature in Windows 10 and later that enables users to run Linux applications (such as Ubuntu) natively on Windows.
More specifically, it provides a Linux-compatible kernel interface that allows Linux binaries to run on Windows.
Why use WSL?
WSL allows developers and system administrators to use Linux tools and utilities, such as bash, grep, sed, and awk, directly on Windows, without the need for a separate virtual machine or dual-boot setup.
This makes it easy to develop, test, and deploy applications that are designed to run on Linux.
WSL also includes a command-line interface (CLI) for managing and configuring the Linux environment on Windows. Users can:
- Install and manage Linux distributions, such as Ubuntu, Arch, Debian, etc.
- Create and manage Linux user accounts
- Configure network settings and system preferences
Personally, this is such an awesome feature because I can run my Windows native applications like Photoshop, Steam, etc alongside my development environment in Ubuntu.
… Not to mention, this allows me to use my GPU at its full power as GPU drivers for Linux are usually… lacking.
How does WSL work?
WSL uses a lightweight Hyper-V virtual machine to run a full Linux kernel, providing better performance and compatibility with a wider range of Linux applications.
Overall, WSL is a powerful tool for developers and system administrators who need to work with Linux-based tools and utilities on a Windows platform. It provides a seamless experience that allows users to work with Linux applications and tools alongside their Windows applications.
How to use minikube on WSL
I assume you already have WSL installed on your computer. I’m using Ubuntu v20.04 LTS as my Linux flavor of choice.
Step 1: Install Docker on Windows
The first step is to install Docker on Windows by following this link.
After installation, open the Docker Desktop application on Windows.
Turn on Docker’s WSL Integration Settings
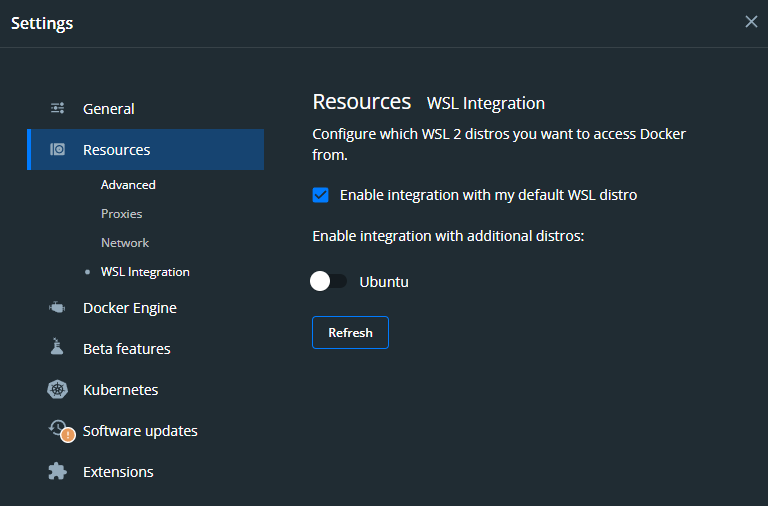
After installation, navigate to Settings (gear icon) -> Resources -> WSL Integration.
Then check the box for Enable integration with my default WSL distro.

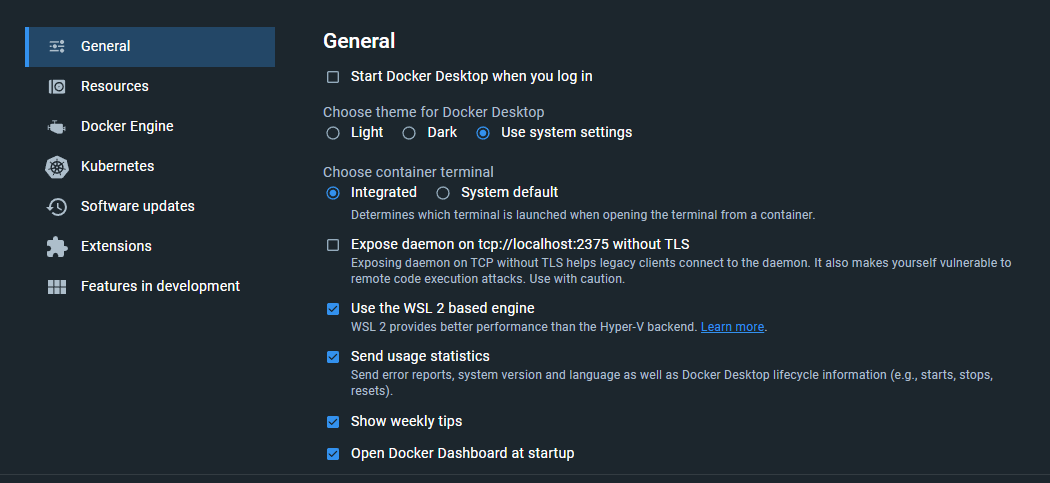
Then navigate to General and then check the box Use the WSL2 based engine.

Step 2: Install minikube on Windows
Then, you just need to install minikube on Windows.
Nothing is simpler! Follow this link to install it on your computer.
Configure WSL to access minikube
To easily access minikube on the Windows side, we can create small script at location /usr/local/bin/minikube with the following contents:
#!/bin/sh
/mnt/c/Program\ Files/Kubernetes/Minikube/minikube.exe $@
Step 3: Install kubectl on WSL (Ubuntu)
To access and execute commands to our Kubernetes cluster created by minikube, we need a CLI tool to do so.
The tool that we’re going to want to use is called kubectl. This is industry standard!
Follow this link to install kubectl.
Please note that this installation will happen on WSL with Ubuntu and not on the Windows side.
Step 4: Configure kubectl to use minikube
We first need to create the configuration to access minikube on Windows with kubectl. We can do this by starting minikube like so:
minikube start
This step is crucial. You should see minikube start successfully.
😄  minikube v1.29.0 on Microsoft Windows 11 Pro 10.0.22000.1574 Build 22000.1574
✨  Using the docker driver based on existing profile
👍  Starting control plane node minikube in cluster minikube
🚜  Pulling base image ...
🔄  Restarting existing docker container for "minikube" ...
🐳  Preparing Kubernetes v1.26.1 on Docker 20.10.23 ...
🔗  Configuring bridge CNI (Container Networking Interface) ...
🔎  Verifying Kubernetes components...
    ▪ Using image gcr.io/k8s-minikube/storage-provisioner:v5
🌟  Enabled addons: default-storageclass, storage-provisioner
🏄  Done! kubectl is now configured to use "minikube" cluster and "default" namespace by default
Afterwards, you should see the minikube configuration in the %UserProfile%\.kube\config file on Windows.
Copy Windows kubeconfig
Don’t skip this step!
Copy the contents of .kube/config from Windows to WSL (Ubuntu) with the following command:
cp /mnt/c/Users/{USER_ACCOUNT}/.kube/config ~/.kube
You should see the contents of .kube/config as follows:
apiVersion: v1
clusters:
- cluster:
    certificate-authority: C:\Users\{...}.crt
    extensions:
    - extension:
        last-update: {}
        provider: minikube.sigs.k8s.io
        version: v1.29.0
      name: cluster_info
    server: https://{...}
  name: minikube
contexts:
- context:
    cluster: minikube
    extensions:
    - extension:
        last-update: {...}
        provider: minikube.sigs.k8s.io
        version: v1.29.0
      name: context_info
    namespace: default
    user: minikube
  name: minikube
current-context: minikube
kind: Config
preferences: {}
users:
- name: minikube
  user:
    client-certificate: C:\Users\{...}.crt
    client-key: C:\Users\{...}.key
You’ll need to convert the Windows file paths into WSL file paths.
For example, convert C:\Users\carmencincotti\ to /mnt/c/Users/carmencincotti. Note the difference in the direction of the slashes (\ versus /).
If you’re unsure how to do this, you can use the command wslpath like so:
wslpath -u "C:\Users\carmencincotti\.minikube\profiles\minikube\client.key"
>> /mnt/c/Users/carmencincotti/.minikube/profiles/minikube/client.key
Step 5: Copy the Docker environment
Finally, we only need to inject the Docker environment variables into the environment of WSL (Ubuntu).
To do this, just use these two commands:
eval $(sh /usr/local/bin/minikube docker-env --shell=bash)
export DOCKER_CERT_PATH=$(wslpath -u "${DOCKER_CERT_PATH}")
To verify that these two commands worked, you can use the env command in the terminal to see if the configuration has been added to the env.
Access minikube on WSL with kubectl
Afterwards, it is now possible to use kubectl to send commands to minikube from WSL!
kubectl config use-context minikube
>> Switched to context "minikube".
kubectl get nodes
>> NAME       STATUS   ROLES           AGE     VERSION
>> minikube   Ready    control-plane   6d22h   v1.26.1