
❗ This article is part of the WebGPU Cloth Simulation project. To see this code, see this repo in GitHub 🧵
Before developing a cloth simulation, I would like to develop a strong code foundation using WebGPU. That’s why I would like to start with a Wavefront .OBJ file loader to render a 3D model. This way, we can render a 3D model quickly as well as build a simple and robust rendering engine to accomplish this task. Once we have a solid foundation, we can easily implement the cloth simulation portion.
The Wavefront .OBJ file
.OBJ is a file format containing the description of a 3D geometry created by the company Wavefront Technologies. The structure of a typical .OBJ file contains a set of:
- Vertices
- Normals
- Texture coordinates
- Faces
Let’s see an example. A .obj pyramid is defined as follows:
v  0  0  0
v  1  0  0
v  1  1  0
v  0  1  0
v  0.5  0.5  1.6

f  4// 1// 2//
f  3// 4// 2//
f  5// 2// 1//
f  4// 5// 1//
f  3// 5// 4//
f  5// 3// 2//
Rendering this file, we might see a pyramid that looks like this image:

So the question arises 🤔:
How could we load this file format into our program?
We will see how to do this with ready-to-use .OBJ files in order to render complex geometries. The beauty of using another’s labor to spare us the hard work. 💅
How do we find .OBJ files?
I use Google to find .OBJ files. That said, if I find a file that I like, I have to load it into software like Blender for several reasons:
-
Format Consistency: When you use Google to find .OBJs files, they all have small format peculiarities. For example, they could define vertices and faces with or without slashes. I would like to load and export with Blender to guarantee the format of the file contents. 📁
-
Positioning of geometries: Sometimes, the model is positioned in a way that we don’t want. Correcting the initial position in Blender can save us some time and code.
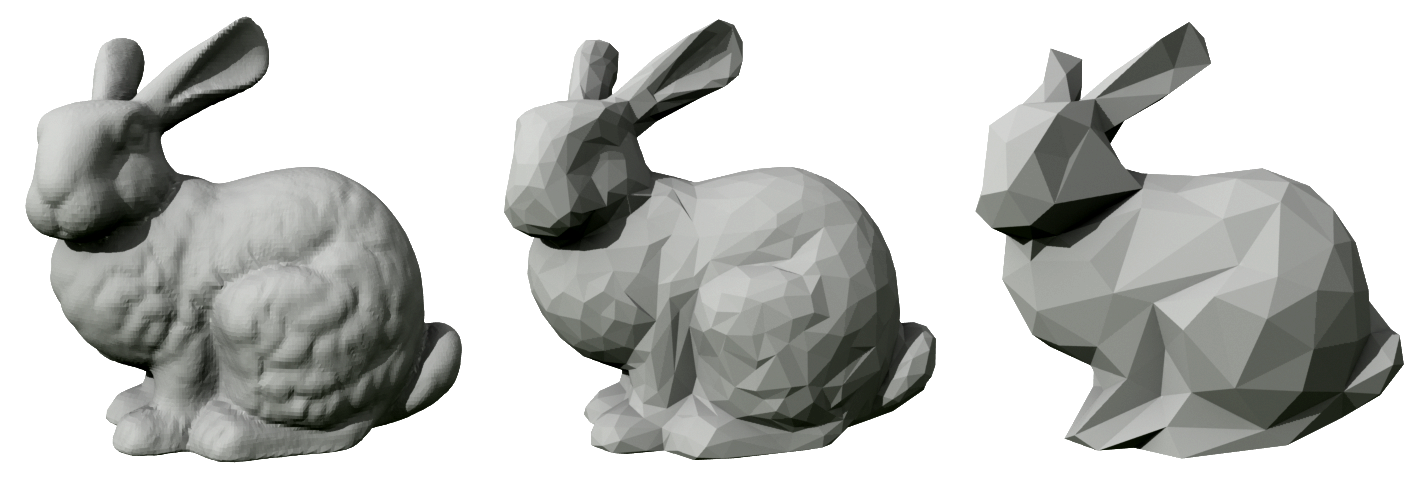
Let’s see an example. For this project, I’d like to use the famous Stanford Rabbit. The file can be found here :
How to prepare geometry in Blender
After downloading the file, we need to open it in 3D software like Blender to check it. Immediately we can see a problem with the position:

I would like to center the bunny so that its body is at the origin. To do this is quite simple. Here are those steps:
- Place the origin on the rabbit. Right click, then navigate to Set Origin > Origin to Geometry.

- Move the rabbit to the scene origin. Right-click, then navigate to Snap > Cursor Selection.

The rabbit is now centered at the origin 🎯:

- Finally, a good idea is to check the normals associated with the model. We can redo the calculation by entering Edit Mode (by pressing TAB) in Blender and navigating to Mesh > Normals > Recalculate Outside:

💡How to visually see the normals in Blender
To see the normals in order to check them, open the Overlays menu and check a box with the label Normals:

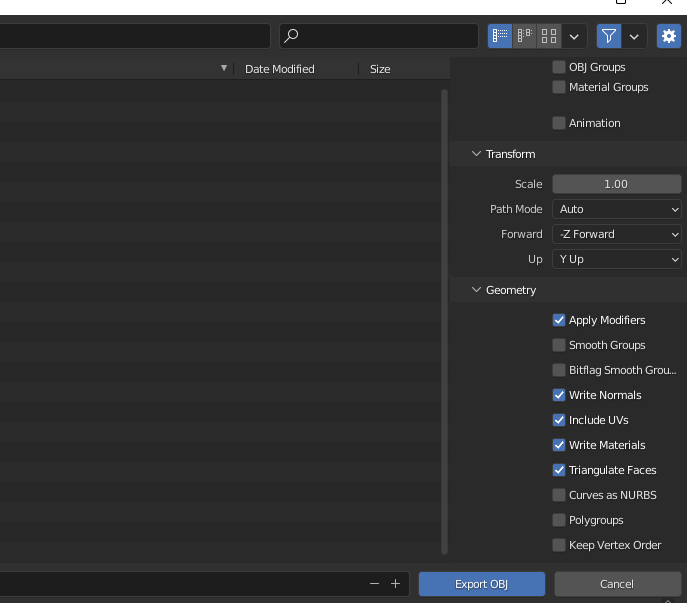
- Navigate to File > Export > Wavefront (.obj). You can export the file using these settings below:
✅ Apply Modifiers
✅ Write Normals
✅ Include UVs
✅ Write Materials
✅ Triangulate Faces
After that, you should have an .OBJ file ready to render in the browser using WebGPU. 🥳
The WebGPU code
💡The code now assumes that the file was prepared by Blender. If not, see the previous section.
The goal is to store all our data that is in the .OBJ file in buffers. Fortunately, the data is easily readable. I designed the system in two parts:
- Loader - We load the file and store its text in memory so that we can process it.
- Parser - With the text stored in memory, we can parse the lines of text and store them in the buffers.
Loader
Let’s look at the load() function :
async function load(filePath: FilePath): Promise<ObjFile> {
    const resp = await fetch(filePath);
    if (!resp.ok) {
      throw new Error(
        `ObjLoader could not fine file at ${filePath}. Please check your path.`
      );
    }
    const file = await resp.text();

    if (file.length === 0) {
      throw new Error(`${filePath} File is empty.`);
    }

    return file;
}
The idea of this code is simply to fetch the contents of a file, located at a filePath. I store my files on my hard drive, but it is possible to request the data by HTTP.
Parser
Here is the first part of the code:
parse(file: ObjFile): Mesh {
    const lines = file?.split("\n");

    // Store what's in the object file here
    const cachedVertices: CacheArray<CacheVertice> = [];
    const cachedFaces: CacheArray<CacheFace> = [];
    const cachedNormals: CacheArray<CacheNormal> = [];
    const cachedUvs: CacheArray<CacheUv> = [];

    // Read out data from file and store into appropriate source buckets
    {
      for (const untrimmedLine of lines) {
        const line = untrimmedLine.trim(); // remove whitespace
        const [startingChar, ...data] = line.split(" ");
        switch (startingChar) {
          case "v":
            cachedVertices.push(data.map(parseFloat));
            break;
          case "vt":
            cachedUvs.push(data.map(Number));
            break;
          case "vn":
            cachedNormals.push(data.map(parseFloat));
            break;
          case "f":
            cachedFaces.push(data);
            break;
        }
      }
    }

... Rest of code
}
This part consists of simply reading data from memory and storing them in corresponding arrays. Fortunately, each line of text is labeled with its associated type:
v- the position of a vertexvt- texture coordinates (uv)vn- the normal vector (normal)f- the face (three vertices that form a triangle)
Here is the rest of the code:
... the code before
    // Use these intermediate arrays to leverage Array API (.push)
    const finalVertices: toBeFloat32[] = [];
    const finalNormals: toBeFloat32[] = [];
    const finalUvs: toBeFloat32[] = [];
    const finalIndices: toBeUInt16[] = [];

    // Loop through faces, and return the buffers that will be sent to GPU for rendering
    {
      const cache: Record<string, number> = {};
      let i = 0;
      for (const faces of cachedFaces) {
        for (const faceString of faces) {
          // If we already saw this, add to indices list.
          if (cache[faceString] !== undefined) {
            finalIndices.push(cache[faceString]);
            continue;
          }

          cache[faceString] = i;
          finalIndices.push(i);

          // Need to convert strings to integers, and subtract by 1 to get to zero index.
          const [vI, uvI, nI] = faceString
            .split("/")
            .map((s: string) => Number(s) - 1);

          vI > -1 && finalVertices.push(...cachedVertices[vI]);
          uvI > -1 && finalUvs.push(...cachedUvs[uvI]);
          nI > -1 && finalNormals.push(...cachedNormals[nI]);

          i += 1;
        }
      }
    }

    return {
      vertices: new Float32Array(finalVertices),
      uvs: new Float32Array(finalUvs),
      normals: new Float32Array(finalNormals),
      indices: new Uint16Array(finalIndices),
    };
  }
Next, we iterate through faces in order to create and store the data in the final buffers. We use something called an index buffer, which is a way to avoid storing duplicate data. We’ll see how in a moment.
💡 The face of an .OBJ file
The definition of a face gives us the data associated with the three vertices that form a triangle.
f v0/vt0/vn0 v1/vt1/vn1 v2/vt2/vn2
Let’s review the data from the pyramid before:
v  0  0  0
v  1  0  0
v  1  1  0
v  0  1  0
v  0.5  0.5  1.6

f  4// 1// 2//
f  3// 4// 2//
f  5// 2// 1//
f  4// 5// 1//
f  3// 5// 4//
f  5// 3// 2//
As I said, each face is defined by three vertices, and each number represents an index (not indexed to zero) that can be used to index into the list of a specific attribute. For example: f 4// 1// 2// is formed with vertices that have positions (0 1 0), (0 0 0), (1 0 0).
We can imagine that if there had been definitions of normals and texture coordinates, we might have seen numbers like this: f 4/1/3 1/2/2 2/4/3.
🤔 A good idea is to take a close look at your file that came out of Blender.
Buffer types
As we saw in the discussion where we rendered a triangle in WebGPU, we use buffers to store attributes at each vertex.
More specifically, one or more Vertex Buffer Objects (VBOs) and an Index Buffer Object (IBO) are used. We use the indices in the IBO to index into a VBO to avoid storing duplicate data.
Let’s look at an example :

The vertex with label 2 is in two triangles (one formed by vertices 1, 2, 3 and the other by vertices 3, 2, 4). Let’s define the data as follows:
 position_vbo = [
     -1, 0, 0, #v1
     1, 0, 0, #v2
     0, 1, 0, #v3
     2, 1, 0, #v4
 ]

 color_vbo = [
     1, 0, 0, #v1
     0, 0, 1, #v2
     1, 1, 0, #v3
     2, 1, 0, #v4
 ]

 indices_ibo = [
    0, 1, 2, # triangle 1
    2, 1, 3  # triangle 2
]
As we can see, we can reuse the data in position_vbo and color_vbo by using indices. In the code, we build arrays, such as positions which will serve as a vertex attribute and thus live in a VBO, and indices (which will serve as the IBO) for use in the application - which we’ll see in a later part.
Next time
We’ll see the next step - how to render this 3D data that we loaded with our new .OBJ loader and also we’ll take a closer look at rendering features like depth testing.