
The lighting of a 3D scene is necessary to give an impression of realism. In real life, light is everywhere. For example, we find sunshine outside. There is the lights from lamps on our desks. Streetlights guide us at night, etc.
The other side of lighting is the materials that receive it. How light interacts with a material depends on its surface properties. Is the material shiny? Rough? Dull?
By applying lighting in a 3D scene, we can introduce realism into our scenes. Additionally, we can see more details of our models. Here is the back side of the bunny without the lighting model 🐇:

Here is the result of the rabbit with such a model:

The difference is clear and brilliant! A typical and basic pattern with which we light our scenes is called the Phong lighting model.
The Phong Lighting Model 💡
The model consists of three parts:

By Brad Smith; — Personal work, CC BY-SA 3.0, Link
These three parts are:
- Ambient - The world is never perfectly dark as there is light that may come from a culmination of insignificant sources (distant city lights, the moon on a starry night, etc.). It’s much easier to model this as a constant value to avoid complex calculations.
- Diffuse - This lighting depends on the position and direction of the light source. If the surface of an object faces the light source directly, it would be brighter than in the contrary case.
- Specular - The glowing mark on the object under a light. The magnitude of this effect depends on the material of the object and the position of the camera.
This model is just that - a model. Other models exist. However, to create a performant and pretty scene at the same time, you will have to take shortcuts!
Ambient lighting
Ambient lighting is a simple component of lighting a scene. It is a light source that illuminates an object evenly.
However, this “uniform illumination” approximation is a gross simplification of the behavior of photons. Photons from any source bounce and scatter.
If we assume in real life that there are many light sources, we should totally avoid the super complex calculation by approximating photon behavior by just adding a constant color to the final image.
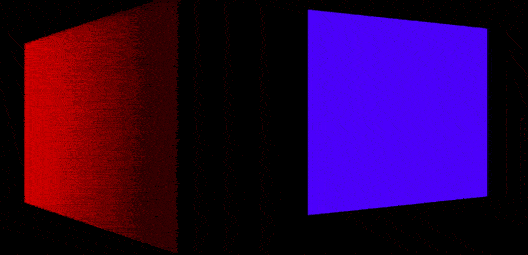
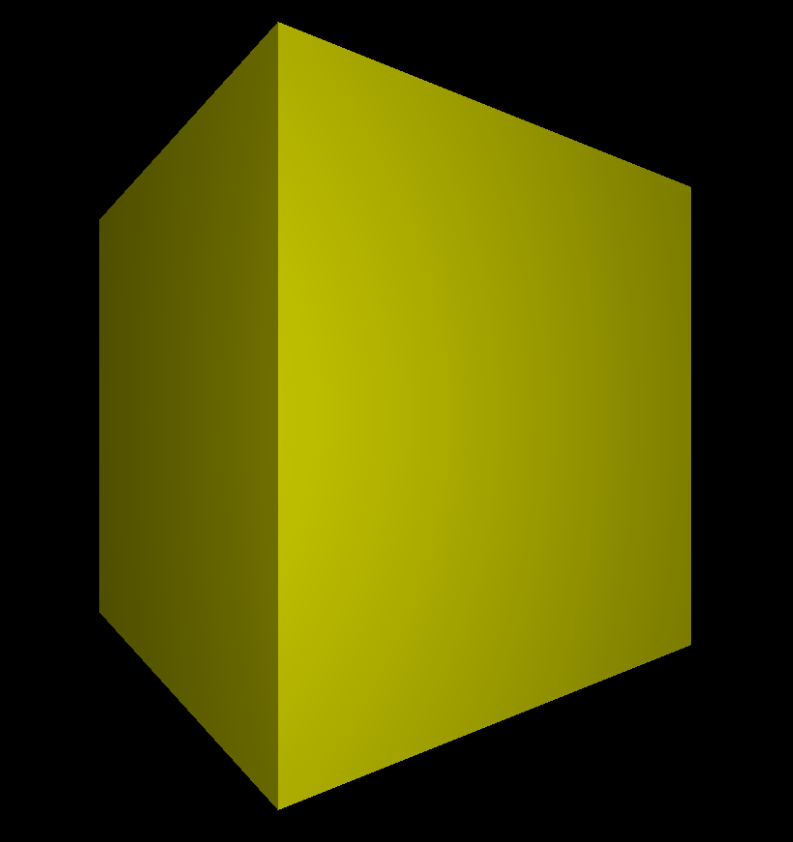
Here is an example of a cube with ambient lighting applied:
We add the ambient lighting code in the fragment shader as follows:
@stage(fragment)
fn main(fragData: VertexOut) -> @location(0) vec4<f32>
{
    let ambientLightIntensity = 0.2;
    let lightFinal = ambientLightIntensity;
    return vec4(1.0, 1.0, 0., 1.0) * lightFinal;
}
Diffuse lighting
In real life, an object is never homogeneously illuminated. For example, the face of an object under a lamp, the sun, etc. would be brighter if it was directly under the light. In contrast, a face facing the opposite direction would be darker.
A property of a material is its ability to reflect and scatter light. Diffuse lighting is characterized by the behavior observed when a surface reflects and disperses light in all directions:

We can easily simulate this behavior using linear algebra. If you don’t understand linear algebra at all, that’s okay! Look at this image which represents the diffuse model that we are going to simulate:
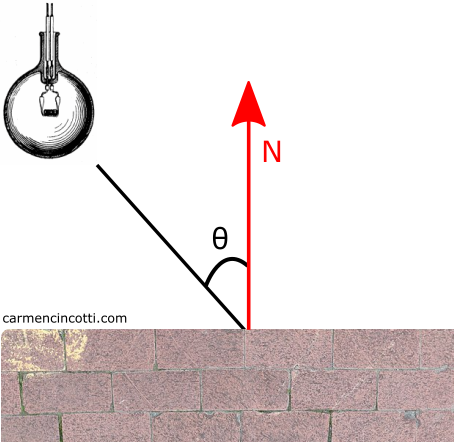
Imagine the face of the object is the brick wall with a normal vector (in red) pointing up. An angle is formed between the light source and the normal vector which is called the angle of incidence.
Normal vector
A normal vector is a unit vector perpendicular to the surface at a given vertex.

Remember that we used Blender to export our .OBJ files. The normals are therefore already defined for us. It is always possible to calculate them with the cross product.
Diffuse lighting implementation
Here is the vertex shader code:
@stage(vertex)
fn ${VERTEX_ENTRY_POINT}(
    @location(0) position: vec4<f32>,
    @location(1) normal: vec4<f32>) -> VertexOut
{
    var output : VertexOut;
    output.position = projectionMatrix * viewMatrix * modelMatrix * position;

    output.vNormal = normalMatrix * normal;
    output.vPos = modelMatrix * position;
    return output;
}
To calculate the magnitude of diffuse light, we need vNormal and vPos. This choice to multiply the position by the modelMatrix will be clearer once we introduce the fragment shader code in the following section.
What’s interesting is the idea of introducing the concept of a so-called normalMatrix. I’ll take a sidebar to talk about it.
The Normal Matrix
The normal matrix is a transformation matrix that we use to transform the normals of an object. It’s really important to use them for light calculations.
Let’s first look at the problem that normal matrices solve.
If I rotate a cube, the normals will remain the same as we are only transforming the positions of the vertices (with the modelMatrix in the vertex shader), and not the normals (as seen with the left cube). However, to calculate the relation between the normal vector and the light, the normals must rotate along with the object (right cube). This is done by transforming our normal values with the normal matrix!
Why is it necessary to use such a matrix, and not blindly take the inverse of the model matrix?
It is possible to do this, but the problem with the model matrix is that such a matrix can have non-uniform scaling - which would totally change the direction of the normal vector after having calculated it.
How do you calculate such a matrix?
The pseudocode is as follows:
transpose(invert(modelMatrix))
Again, I can use the modelViewMatrix if there is no non-uniform scaling. To learn more, I recommend this article.
Here is the code for the fragment shader:
@stage(fragment)
fn ${FRAGMENT_ENTRY_POINT}(fragData: VertexOut) -> @location(0) vec4<f32>
{
    let diffuseLightStrength = 1.4;
    let ambientLightIntensity = 0.2;

    let vNormal = normalize(fragData.vNormal.xyz);
    let vPosition = fragData.vPos.xyz;
    let lightPosition = lightModelPosition.xyz;

    let lightDir = normalize(lightPosition - vPosition);
    let lightMagnitude = dot(vNormal, lightDir);

    let diffuseLightFinal: f32 = diffuseLightStrength * max(lightMagnitude, 0);
    let lightFinal = diffuseLightFinal + ambientLightIntensity;
    return vec4(1.0, 1.0, 0., 1.0) * lightFinal;
}
What’s interesting to me is the calculation of the lightDir and lightMagnitude.
The light direction
Let’s take an example to clarify this calculation:
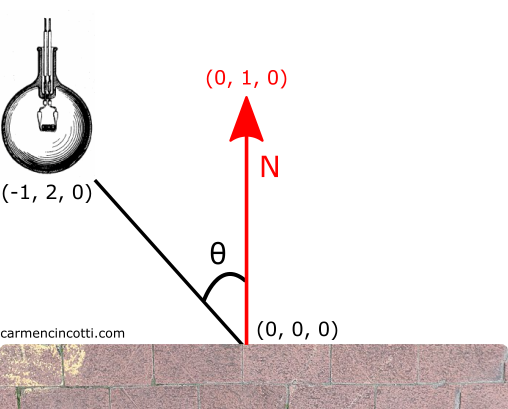
First, we need to calculate the lightDir, which is the direction vector of the light source is pointing.
Let’s suppose that the light position is at (-1, 2, 0) and the position of the surface is at (0, 0, 0). The calculation for lightDir is as follows :
💡 We have to normalize it because it is a direction. This normalization will also be useful when calculating the lightMagnitude which depends on the dot product.
The light magnitude
The dot product is used to determine the extent in which lightDir is projected onto the normal vector (pointing to (0, 1, 0)). This calculation returns to us a scalar value that can be used to scale the contribution of diffuse light to the final image.
So, we must contribute 89.44% of the diffuse light to the color of this fragment.
The result
To wrap up the discussion of diffused light, I would like to show the result:
Specular Lighting
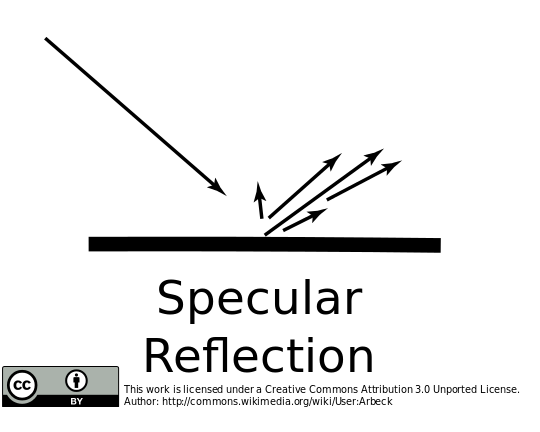
Specular lighting is associated with a certain shininess of a reflective material.

Let’s look at this violin. In its middle, there is bright highlights. This behavior is modeled by the specular reflectance model which is similar to a mirror:
Implementing Specular Lighting
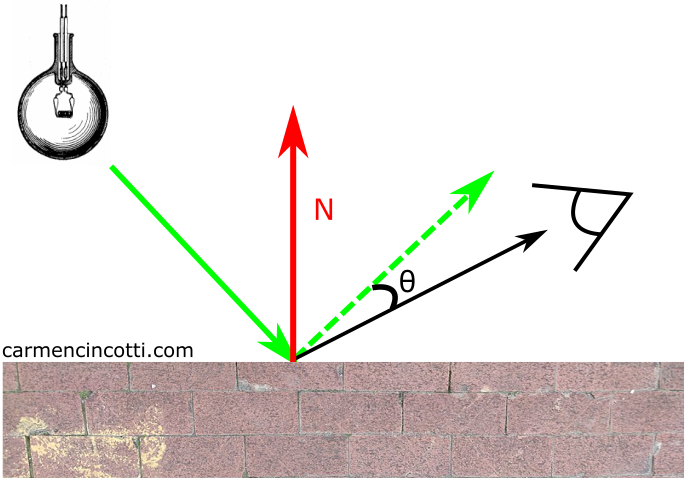
We must find the reflection vector which is the reflection of the direction of the light around the normal vector, then calculate the angle of incidence between this vector and the direction of the camera.
Here’s some code :
        let specularStrength = 0.5;
        let specularShininess = 40.;

        let vNormal = normalize(fragData.vNormal.xyz);
        let vPosition = fragData.vPos.xyz;
        let vCameraPosition = cameraPosition;

        let lightDir = normalize(lightPosition - vPosition);
        let lightMagnitude = dot(vNormal, lightDir);
        let diffuseLightFinal: f32 = diffuseLightStrength * max(lightMagnitude, 0);

        let viewDir = normalize(vCameraPosition - vPosition);
        let reflectDir = reflect(-lightDir, vNormal);
        let spec = pow(max(dot(viewDir, reflectDir), 0.0), specularShininess);
        let specularFinal = specularStrength * spec;

        let lightFinal = specularFinal;
        return vec4(1.0, 1.0, 0., 1.0) * lightFinal;
I’ve included some settings to change the shine power with specularShininess. It’s up to you to play with this parameter!
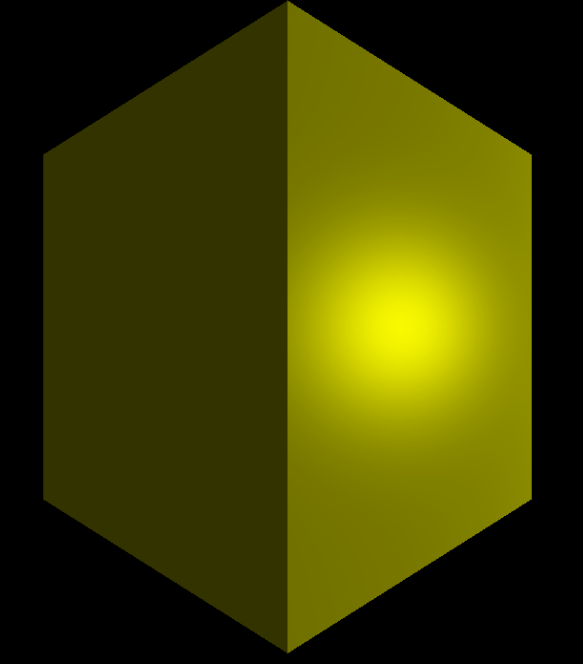
And finally - here is the result of the cube with all three lighting models applied:
Exercises
A potential exercise would be to write the fragment shader so that it includes all three lighting effects in Phong’s model!