
❗ This article is part of the WebGPU Cloth Simulation project. To see this code, see this repo in GitHub 🧵
A bug had plagued me this week. Equipped with my new .OBJ loader, I was ready to render a Stanford bunny. Much to my dismay, I had also encoutered some bad bugs 🪲 that the lack-of depth testing was causing.
During this post, I would like to explore this bug while answering the question: what are depth textures?
The depth texture bug 🪲
Here’s the image of the Stanford bunny that I first rendered:

It didn’t look right to me! The rendering of the ears was weird…
I was beginning to doubt the bunny file -could it be wrong? I re-exported it from Blender. Unfortunately, the problem remained.
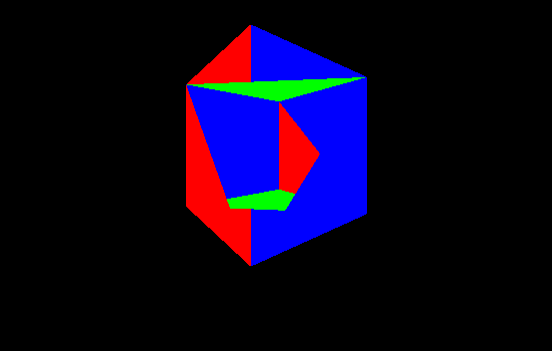
Then, in a moment of clarity, I decided to render a model with less complexity. A cube 🧊 - and the result was the same compared to the rabbit:
The process of fixing this error was a big waste of time. I mistakenly thought the problem was my .OBJ file loader. However, the real problem was with depth testing (and the fact that I neglected it).
The problem and possible solutions
The problem in plain terms is the rendering order of the fragments. The last rendered triangle will be visible even if there is a triangle behind it. So we have two choices to solve this problem:
- 🔘 Sort - Sort all triangles by depth before rendering.
- 🔘 Use a depth buffer - Implement a depth buffer and let it do the hard work (depth test and final image resolution).
Since I am lazy, my choice is naturally number two and that is exactly the choice I chose. 🦥
⚠️ This solution works for me because my needs are not complex. If you’re having transparency issues, you need to find a solution.
Back to depth testing
Several weeks ago, I wrote an article on depth buffers and also on depth testing. Remember that depth buffers store z coordinates of an image.
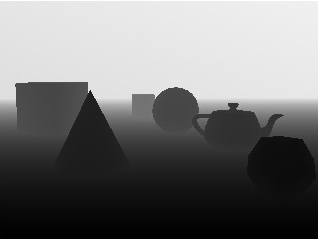
Here is an image that illustrates the color buffer (top) and the depth buffer (bottom):

Depth tests are used to resolve the visibility of all primitives in the final image. With that said, if there is a primitive hidden behind another, we would want to avoid rendering it in the final image.
The GPU handles this for us. It compares calculated depth values (the z-value) of all the pixels associated with different primitives at a given screen location. Here is an example of the process:

In this case - the z-value and the color of the closest pixel are stored in the framebuffer to be rendered. This type of testing is called depth testing.
Otherwise, these pixel values are therefore not overwritten.
The solution to the bug in WebGPU 🥳
Suppose I use the triangle code we created with WebGPU several months ago. We must first configure our renderDescriptor using the depthStencilAttachment field as follows:
    const renderPassDescriptor: GPURenderPassDescriptor = {
        colorAttachments: [
          ...
        ],
        depthStencilAttachment: {
            view: depthTexture.createView(),
            depthClearValue: 1.0,
            depthLoadOp: "clear",
            depthStoreOp: "store",
        },
    };
where depthTexture is initialized as follows:
    const depthTexture = this.device.createTexture({
      size: this.presentationSize,
      format: "depth24plus",
      usage: GPUTextureUsage.RENDER_ATTACHMENT,
    });
Recall that in the last part, we saw an image that represents a depth texture (in black and white):
Looking at this image, we see that the nearest objects are black. We set depthStencilAttachment.depthClearValue to 1.0 which represents ‘as far as possible’ (white), which implies that 0 means ‘as close as possible’.
Initializing the depthTexture is quite simple for us thanks to our simple requirements:
- Size - It must be the same size (“size”) as the color buffer.
- Precision - It must have sufficient precision, which is usually at least 24 bits.
The final configuration is in the call to GPUDevice.createRenderPipeline:
this.device.createRenderPipeline({
    primitive: { ...  },
    depthStencil: {
        depthWriteEnabled: true,
        depthCompare: "less",
        format: "depth24plus",
    },
    ...shader,
});
This configuration is quite simple to understand. The most relevant thing is that we have to tell the GPU to perform the depth test by comparing depth values and saving the fragments with the lowest one. We configure this behavior by setting the value less for depthCompare.
And here is the result :

Bonus - a memory explosion and how I solved it
When developing the render system, I initially implemented the depth texture incorrectly. However, the problem was not so obvious at first glance.
Google Chrome crashed after a minute while running the rendering code with the error:
Uncaught (in promise) Error: WebGPU cannot be initialized - Device has been lost - GPU connection lost.
Upon refreshing the page, a new error surfaced:
WebGPU cannot be initialized - Adapter not found.
What?! 😧
I was thinking “Oh, this must be a Chrome bug” - but no… it was mine!
How did I know that? I opened up my GPU profiling tools on my computer and saw this:
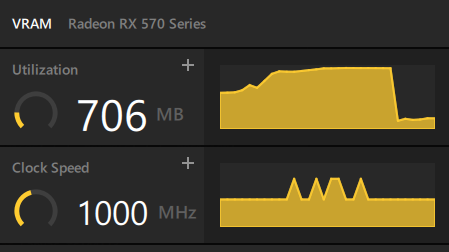
The memory was exploding when running the program!
The problem turned out to be that I was creating a depth texture on the GPU every “frame”! Here is the commented code just below const frame = () => {:
 draw(drawCb: (drawHelper: GPURenderPassEncoder) => void) {
    // ~~ Define render loop ~~
    const depthTexture = this.device.createTexture({
      size: this.presentationSize,
      format: "depth24plus",
      usage: GPUTextureUsage.RENDER_ATTACHMENT,
    });

    const frame = () => {
        // WRONG
        // const depthTexture = this.device.createTexture({
        //   size: this.presentationSize,
        //   format: "depth24plus",
        //   usage: GPUTextureUsage.RENDER_ATTACHMENT,
        // });
        const commandEncoder = this.device.createCommandEncoder();
This adds to the GPU an extra depth texture on every frame! After about a minute, the GPU would kill itself to save itself. What a tragedy!