Understanding the transition from clip space to NDC space concerns us as it is the last step before transforming our 3D coordinates into 2D screen coordinates.

That said, mistakenly rendering certain supposedly “out-of-view” 3D objects in your WebGPU, WebGL, or OpenGL scene may be a symptom of incorrect understanding of clip space, and NDC space.
I am assuming that you understand enough about the computer graphics rendering pipeline to understand most of the terms I will be using over the course of this article.
If you are thinking that you may need a refresher, I suggest you take a look at my rendering pipeline series which starts with learning about 3D Cameras.
Clip space vs. NDC space
Clip space
Clip space is the 3D space where all the vertices that are going to be rendered are present and are positioned within the space as homogeneous coordinates.
At this time, all the positions of the vertices that will be rendered onto the screen are between these coordinates:
- OpenGL, WebGL: and
- WebGPU: and
where is a given vertex’s homogeneous component. More on this later.
As you can see, each graphics API has different specifications. Always be sure to read the documentation to see of your API!
Homogeneous coordinates
is the fourth component of a homogeneous coordinate. It is often called the homogeneous component.
While we will see more on this subject in this article, you can also take a look at my in-depth explanation on homogeneous coordinates.
NDC space
Then, perspective division is performed by the GPU on each vertex. Perspective divide is an operation where for a given vertex position, its x, y, and z components are divided by its homogeneous component, w.
After this division, the vertices are in NDC space.
In NDC space, vertices are positioned in 3D between these coordinates:
- OpenGL, WebGL : and
- WebGPU : and
To be clear, NDC space is the 3D space where our 3D coordinates are after being normalized by the GPU by performing perspective division on the coordinates that were in clip space.

To better understand these concepts, let’s take a closer look at how vertices are transformed between clip and NDC space.
The transformation of a vertex from clip space to NDC
To better understand how a vertex goes from clip space to NDC space, I suggest you follow me in this little tale of a vertex traveling through the rendering pipeline.
Step 1: The vertex shader
We start this journey with a single vertex positioned at . I will define it in a vertex shader like so in WebGL:
    void main()
    {
        gl_Position = vec4(0.5, 0.5, 0.5, 1.0);
    }
Then the shader is sent to the GPU to be executed.
Step 2: Entering clip space
Continuing on its adventure, our sole vertex enters clip space.
You may be asking yourself:
Why is it called clip space ?
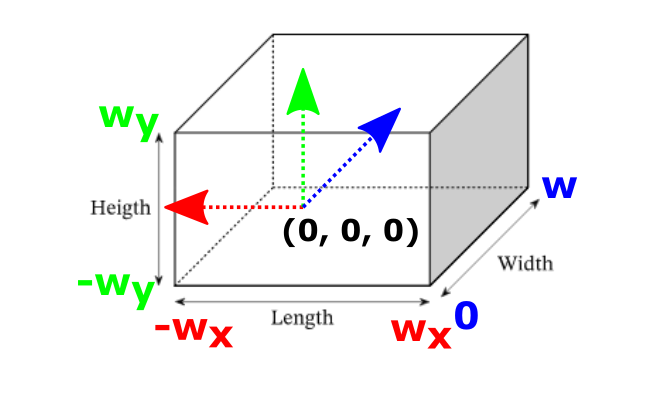
To answer this question, let’s imagine a rectangular prism like so:
For imagination’s sake, lets consider this prism as our clip volume.
What is a clip volume?
To visualize this idea, we can assume that all vertices who fall within our clip volume will continue on through the rendering pipeline for further processing.
All other vertices that fall outside of the prism will be ‘clipped’ by the GPU, meaning that they will be not continue on through the rendering pipeline.
In other words, if a vertex is outside this volume, it will be removed (or ‘cut off’) and thus we won’t see it in the final render.
Clip volume specification by OpenGL, WebGL and WebGPU
Each graphics API defines its own clip volume shape specification. Let’s see some common examples.
OpenGL
The clip volume specified by the OpenGL specification is defined like so:
WebGL
The clip volume specified by the WebGL specification is defined like this:
WebGPU
Finally, the clip volume specified by the WebGPU specification is defined like this:
Clipping the vertices
Let’s continue on by assuming that we are using WebGPU as our graphics API to render this scene:

With this single vertex positioned at , it is clear that this vertex is inside the clip volume which we recall that it is defined as follows:
This vertex will therefore not be clipped by the GPU and it will continue to be processed through the rendering pipeline.
Step 3: Perspective divide
This is the moment we’ve been waiting for since the beginning. Our only vertex positioned at is ready to enter NDC space.
The GPU will perform an important operation to normalize the position of the vertex.
This operation is called the perspective divide.
Remember that we just clipped all vertices that were outside the clip volume with specified dimensions of2wx 2wx w.
Remember that we just clipped all vertices that were outside the clip volume with specified dimensions of2wx 2wx w.
Therefore, the normalized position components of the vertex should be between and after normalizing them by dividing the x and y components by the w component. It follows that the normalized z component will fall between and .
⚠️ Each graphics API is different and you should view the docs of the graphics API that you plan to use, but in the case of WebGPU, NDC is between (-1, -1, 0) and (1, 1, 1).
The vertex is now in NDC space!
What happens next?
The next step is to convert the coordinates of our single vertex from 3D to 2D, click the link to learn more.
Resources
- Carmen Cincotti - Drawing a Triangle with WebGPU
- Carmen Cincotti - Homogeneous Coordinates, Clip Space, and NDC | WebGPU
- web.dev WebGPU
- WGSL - W3
- WebGPU Explainer
- Stack Exchange - Why is clip space always referred to as “homogeneous clip space”?
- Tom Dalling - Explaining Homogeneous Coordinates & Projective Geometry
- Stack Overflow - No, clip space and NDC space are not the same thing.
- Keenan Crane - Homogeneous Coordinates
