
Video
We continue this series by looking at how to set up the context of our HTML <canvas /> element so that we can use the WebGPU API to draw onto it.
Along the way, we’ll learn about the swap chain. Specifically, we’ll see how WebGPU implements it, and how this implementation may be easier to configure than other graphic API’s like Vulkan.
Can’t Wait For The Series To End?
If you would like to move ahead without waiting for the next video in the series, I recommend scrolling down to the code below, or checking out my Rendering a Triangle in WebGPU article.
The WebGPU Triangle Video Series Code
During this series, we will study this code which you can find in this article where we begin the series.
Before being able to render this code, you need to download a browser that is able to run WebGPU code.
Configure the WebGPU Canvas Context
To configure the WebGPU context of the HTML <canvas />element that we already initialized in a previous article, nothing could be simpler!
    // https://www.w3.org/TR/webgpu/#dom-gpu-getpreferredcanvasformat
    const presentationFormat = navigator.gpu.getPreferredCanvasFormat();

    context.configure({
        device, // Create link between GPU and canvas.
        format: presentationFormat,
    });
We only need to pass two arguments to the WebGPU context method of the HTML <canvas /> element, context.configure(). These two necessary arguments are the following:
- Device
- Format
There are other arguments, which you can find here, however I will only focus on the two arguments listed above. Let’s take a closer look at them.
Device
The WebGPU device, which we already talked about a week ago, represents the logical connection between our application and the GPU adapter.
In this context, we need one so that we the GPU can draw onto the <canvas /> element.

Format
According to the WebGPU specification, the format field configures:
The format of textures returned by
getCurrentTexture(). Must be one of the Supported context formats.
OK, great. However, the list of possible values is quite long. Fortunately, there is a little shortcut to help us choose a format…
We can call navigator.gpu.getPreferredCanvasFormat() to find out our system’s preferred format. After the call, we need to pass it to our WebGPU <canvas /> context.
Bonus Content: Swap Chain
According to Microsoft, a swap chain is:
a collection of buffers that are used for displaying frames to the user. Each time an application presents a new frame for display, the first buffer in the swap chain takes the place of the displayed buffer. This process is called swapping or flipping.
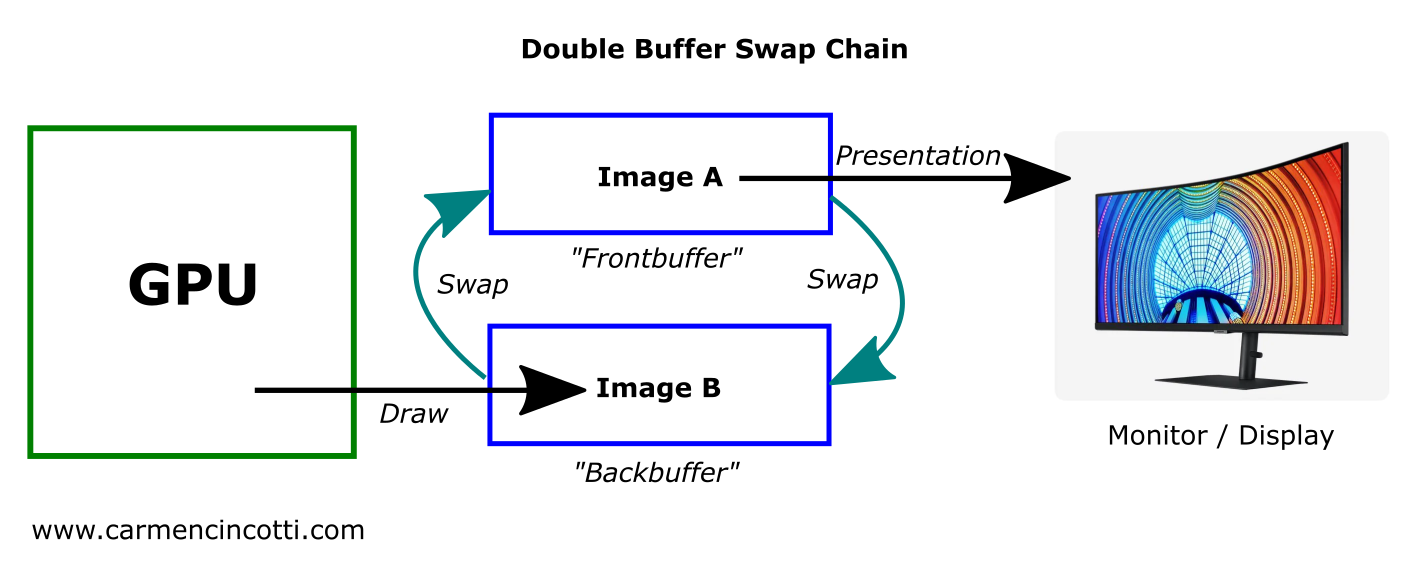
Double Buffer
The configuration of the swap chain on the image below is known as a double buffer configuration:
In the image above, the GPU writes its computed image (computed via the graphics rendering pipeline) into a buffer called the backbuffer.
After the screen “refreshes”, and thus completes its process of displaying the image in the frontbuffer, the frontbuffer and backbuffer “swap places” (we’ll see how shortly).
Simply put, the backbuffer will become the frontbuffer and thus, this new frontbuffer’s image will be rendered during the next screen refresh.
Why use a swap chain?
In short, a swap chain allows the calculation of pixels by the GPU without overwriting what is already being displayed on our monitors. This phenomenon is known as tearing.
We will see how it is able to do this by using multiple buffers and playing well with the screen in a process called vertical synchronization (Vsync).
How to configure swap chain in WebGPU
There isn’t too much on this subject in the WebGPU documentation.
If you are coming from a graphics API like Vulkan, you have probably already noticed that the configuration of the swap chain is almost totally abstracted out by the WebGPU API.
It seems that the context.configure() method does the job of standing up a swap chain for us.
That said, it’s likely that the underlying implementation of the swap chain is similar to the WebGL implementation, which uses a double buffer swap chain configuration.
The Refreshing Screen problem
The monitor does not refresh as fast as needed for real-time rendering. Most refresh rates range from 60Hz (60fps) to around 100Hz.
For the sake of seeing why this may be an issue, let’s imagine that we have a “swap chain” with just one buffer like so:

Since the monitor refresh rate and the rate that the GPU updates the sole buffer are inherently not aligned, there is a super strong possibility that the contents of the buffer may update during a monitor refresh, which would cause an image like below:

This phenomenon is know as tearing.
To avoid such a scenario, we need to leverage two things:
- Multiple buffers
- Vertical Synchronization (VSync)
Multiple Buffers
This tearing problem is addressed by using two (or more) buffers:
The frontbuffer image is sent by the GPU adapter to the screen in order to be displayed.
Simultaneously, the GPU writes the next computed frame to the backbuffer.
When it’s time to display the backbuffer, the GPU adapter changes it’s frontbuffer pointer to the backbuffer and vice-versa.
The backbuffer is now the frontbuffer and the old frontbuffer is now the backbuffer.
OK, but that begs the question: if the adapter swaps the two buffers while displaying an image - would the screen render part of the frontbuffer and part of the backbuffer?
Yes. This is why we need to introduce the concept of vertical synchronization (Vsync).
Vertical Sync
The screen refreshes its image by starting at the top left of the monitor and ending at the bottom right.

Upon reaching the bottom, the monitor recalibrates itself so the process can begin again. This recalibration is called a vertical synchronization.
During a vertical sync, the monitor cannot update what it is displaying.
Thus, this is the perfect opportunity to swap the frontbuffer and the backbuffer! Any buffer updates won’t be seen!
That’s exactly what happens during this small interval of time:

That said, the image in the backbuffer must be ready before vertical synchronization, otherwise it must wait for the next vertical sync interval:

In the image above, we can see that the GPU is taking too long to render the image in the backbuffer. It is therefore necessary to wait for the next vertical synchronization.
Indeed, frames per second of this scene would effectively be cut in half!
The Code for Part 3
You can find the code for this part in this GitHub Gist.
Next Time
We’ll move forward with this project and aim to cover some more topics as we render a WebGPU Triangle together.